Showing posts with label leaf. Show all posts

Thursday, November 14, 2013

Fall Crafts for Toddlers

Pumpkin Circle Painting
Cut out a pumpkin from orange construction paper.
Put small amounts of green, orange, and brown paint onto a paper plate.
Use an empty toilet paper roll and dip into paint.
Press toilet paper roll onto pumpkin creating circles.

Leaf Color Sorting
Go on a leaf hunt!
Dump leaves onto table and let toddler explore while you get paper ready.
Depending on what colors you find, divide up the paper into sections for each color.
Write out the names each color using the same color crayon.
(This makes it easier for the toddler to sort.)
Have toddler sort leaves. Glue onto paper.

Turkey Paper Bag Puppet
(Found the printable for turkey here and made some modifications to the original.
I didn't use the "pilgrim" costume pieces and chose not to print onto colored paper.)
Open printable and print selected pages onto white card stock.
Color with crayon and cut out turkey pieces.
Glue pieces to paper bag.
Gobble Gobble.

Hand Print Turkey and Poem
(Found the printable for Handy Turkey here .)
Print out Handy Turkey sheet.
Paint child's hand with selected colors.
Stamp hand onto sheet.
Add turkey details with markers.
Share with someone you are thankful for.

Indian Corn
Cut out corn cob and husk from yellow and green construction paper.
Cut out many square pieces of assorted tissue paper.
Roll tissue paper pieces into little balls (aka corn kernels).
Dip the corn kernels into glue and stick onto corn cob.

Leaf Wreath
 Go on a leaf hunt!
Cut out a paper plate ring (just cut a circle out of the middle).
OR to make it more fun, cut out a shape from the middle and paint the plate.
Pick off the leaf stems.
Glue leaves to plate.

*The leaves will dry out and curl after a few days.
If you want to make a leaf wreath that will last longer, see Fallen Leaf Wreath.

Fallen Leaf Art

See Fallen Leaf Art.

I hope you enjoy these fall crafts as much as we did!

Happy Crafting!

Wednesday, October 23, 2013

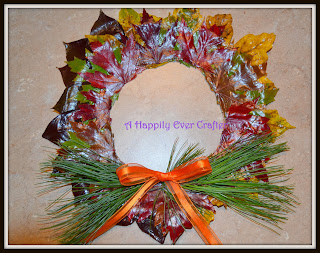
Fallen Leaf Wreath

Don't you just hate when you find an awesome project on Pinterest, try it out and then you are sadly let down by the result?

Yep, me too. But me, not being one willing to accept defeat, will often find or create a better way to complete the project. So here is my first installment of:

Pinterest Upset and Reset

A Leaf Wreath project that I found on Pinterest looked like a simple cute craft for my daughter and I to do together. It seemed like a piece of cake. My daughter loved gathering the leaves. We had all of the  needed materials on hand. The directions were easy to follow and the wreath looked adorable when finished. What a great craft!....

.....There was only one problem. The next day, the wreath looked like this:

Pinterest Upset
The leaves were shriveled up and losing color. The white paper plate was showing through the leaves and the plate was super flimsy. I was not going to let this leaf wreath craft end in disaster.

Pinterest Reset: Fall Leaf Wreath
Doesn't the below wreath look much better?!
Brilliant colors, sturdier, lasts longer, no shriveling of leaves
Want to know how to make one?!


Click on the picture to enlarge.
Materials Needed
Paper Plates (I glued 2 plates together for added stability.)
Mod Podge
Scissors
Paint Brush
Foam Brush
Brown Paint
Assorted Leaves


 Step 1: Go on a leaf hunt! 
Find leaves that are freshly fallen or pick right off the tree for best results. Don't feel bad, the leaves were going to fall off soon anyway!

Step 2: Make the wreath ring
I glued two paper plates together for extra stability. To prevent the white plate from showing through this time, I used brown  paint and coated the plate around the edges. Let dry. Cut a circle out of the middle to create a ring.


 Step 3: Mod podge and leaf in layers
Cut the stems off all the leaves.
Play with the arrangement of the leaves before you start gluing pieces down.

Coat the entire paper plate ring with mod podge. 


Place the bottom layer of leaves around the plate hanging the leaves off of the outer edge.
Coat with more mod podge.

 Add another layer of leaves and coat with mod podge.
(This is a messy craft. Your fingers will be covered in glue but the end result will be worth it).
 Repeat leaf layering and mod podge coating until you have reached your desired look.  Let dry.
Flip the wreath over and brush glue onto the back of the leaves that are sticking out past the paper plate. (Make sure the tips of the leaves are coated.)
Let dry and now you are left with a beautiful Fall Leaf Wreath.

I am not sure how long this wreath will hold up, but it has already surpassed the life span of the last one!

Happy Crafting!

Follow up: After several weeks, the leaf wreath is holding up better than expected. A few of the leaves are starting to curl but overall it still looks great!

Note: The only change that I may make next time, would be to individually coat each leaf with mod podge, letting them dry, and then gluing the leaves onto the paper ring. This method may give the wreath more depth. If you try it using this method, please let me know how it turned out.


Saturday, October 19, 2013

Fallen Leaf Art

The air is crisp, the leaves are changing, and it is sweater season again....yes, FALL has arrived. I love this time of year. I also love fall-inspired crafts. Over the past few days, the beautiful leaves have started falling from our maple trees. I know far too soon the trees will be bare and their beauty lost. It didn't take me long to decide I needed a craft to preserve the beauty of those leaves. I actually came up with several leaf crafts. Now, let's see if they all turn out as well as they did in my head.

Fallen Leaf Art


Materials Needed:
Leaves
Piece of cardboard
white construction paper
mod podge
sponge brush
hot glue gun
scissors

Step 1: Go on a Leaf Hunt! 
We gathered leaves and pine needles from each of the trees in our yard and even from a couple bushes. Make sure you use freshly fallen leaves or leaves pulled directly from the tree. Leaves that are already starting to dry and curl up are no bueno.

Step 2:  Homemade Canvas
Place cardboard in the center of construction paper. Cut the corners off of the paper and hot glue the flaps down. Crease edges. Flip over. Voila! Canvas on the cheap.


Step 3: Mod Podge
Coat the white paper canvas with a healthy dose of mod podge. Then immediately place the leaves on the canvas in a decorative way. If you overlap leaves, make sure you brush mod podge in between those leaves. Once all the leaves are placed, carefully brush a layer of mod podge on top of the leaves. Use your fingers to press the leaves down to the canvas while coating.


Step 4: Dry and touch up as needed
Let canvas dry. Add extra mod podge if needed. Some of the leaf tips lifted off the canvas after drying. I think that actually looks pretty cool. If you do not want the leaves to lift, just add a bit more mod podge and press down with your fingers. 

I haven't decided yet if I'm going to hang this canvas from a ribbon or frame it but I think it turned out great!


Happy Crafting!