
Materials Needed:
Cricut Cutting Machine and accessories (or another means to make traceable letters)
Heat N Bond iron-on adhesive
Rotary Mat
Sewing Ruler
Rotary Cutter
Pencil
About 1-1.5 yard of assorted fabric ( I used 1/8 of green print, yellow print, orange print, and pink print; 1/2 yard of flower print, and 1/4 yard white print)
Coordinating thread
Buttons
Sewing Machine
Iron
Cloth (for ironing)
Sewing Needle
Directions:
Step 1: Traceable Letters
Using a Cricut cutting machine, cut out 5" letters (or larger/smaller). I used the Cutting Up cartridge for the letters and also cut out 3" flowers from the Accent Essentials cartridge. These paper letters/flowers will be used as stencils. You can also make letter stencils by printing out a font from the computer on card stock. There are a TON of free fonts out there.


 Trace the letters with a pencil.


Step 2: Iron-on Letters
Place the iron-on letter cutouts on top of chosen fabrics. Make sure the adhesive side is facing the wrong-side of the fabric.Using a medium heat, press the iron to the Heat N Bond paper bonding the adhesive to the fabric (3-4 seconds). Let cool. Cut out letters following the pencil lines. Peel off paper leaving a shiny side to the back of the fabric.

Step 3: Background Fabric
Cut out fabric for the background. I used a 10" X 22" piece of fabric to make sure it was going to be large enough. You can always cut it down to size later. Adjust the fabric's width and length (larger/smaller) according your font size, number of letters, and embellishments.

Step 4: Fabric Letters
Arrange letters and flowers on the background fabric. Cover with cloth (to prevent marks) and iron with medium-high heat (6-8 seconds). Let cool. Cut background fabric to size. I recommend 1-2" border around the letters. Iron 1/4" seam around the background fabric.

Step 5: Stitch Letter Borders
Set your sewing machine to a short, narrow zig-zag stitch. For length, I use halfway between 0 and 1, and between 3 and 4 for width. Practice a few stitches on scrap fabric to decide what works best for you. Using coordinating thread, stitch a border around each letter. I'm sure this seems like it would be super tricky, but once you practice it, it really isn't that difficult. Remember to back-stitch at the beginning and end of each letter. Trim off all extra threads.


Step 6: Fabric Strips
Cut pieces of assorted fabric into strips that are 2 1/2" wide (or larger/smaller) and varied lengths. Arrange strips into four rows (one for each side of pillow) and sew right-side ends together. This should make 4 patchwork-like fabric strips.


 Step 7: Patchwork Border
Line up one fabric strip to a corner of the background fabric and pin the right sides together along the entire border of the background fabric. Attach the border by sewing a 1/4" seam around the outside (follow the seam line that was ironed around the fabric already). Unpin the fabric and repeat this step for each side of the background fabric.


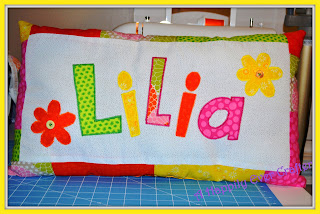
 Measure the border on each side to make sure it is even and trim the material if necessary. Cover with cloth and iron on medium-high heat. For added cuteness, I sewed a couple buttons to the middle of the flowers.


Step 8: Pillow Back
Lay the front pillow piece on top of material for the back of the pillow. Cut the back fabric to size. With right sides of fabric facing each other, sew front and back fabrics together. Leave a 4-5 inch gap not sewn and flip fabric right-side out.


Step 9: Stuff and Stitch
Fill pillow with batting/stuffing until you have reached desired fluffiness. Using a whip stitch, sew up the remainder of the pillow. You're finished!

Cricut Cutting Machine and accessories (or another means to make traceable letters)
Heat N Bond iron-on adhesive
Rotary Mat
Sewing Ruler
Rotary Cutter
Pencil
About 1-1.5 yard of assorted fabric ( I used 1/8 of green print, yellow print, orange print, and pink print; 1/2 yard of flower print, and 1/4 yard white print)
Coordinating thread
Buttons
Sewing Machine
Iron
Cloth (for ironing)
Sewing Needle
Directions:
Step 1: Traceable Letters
Using a Cricut cutting machine, cut out 5" letters (or larger/smaller). I used the Cutting Up cartridge for the letters and also cut out 3" flowers from the Accent Essentials cartridge. These paper letters/flowers will be used as stencils. You can also make letter stencils by printing out a font from the computer on card stock. There are a TON of free fonts out there.


Here are the letters that I cut out from scrap paper.

Place each letter backwards onto the paper side of the Heat N Bond iron-on adhesive.


Cut the paper surrounding the outside of each letter (not cutting the actual letters out yet).

Step 2: Iron-on Letters
Place the iron-on letter cutouts on top of chosen fabrics. Make sure the adhesive side is facing the wrong-side of the fabric.Using a medium heat, press the iron to the Heat N Bond paper bonding the adhesive to the fabric (3-4 seconds). Let cool. Cut out letters following the pencil lines. Peel off paper leaving a shiny side to the back of the fabric.

Here is what the letters look like after being cut out.
Step 3: Background Fabric
Cut out fabric for the background. I used a 10" X 22" piece of fabric to make sure it was going to be large enough. You can always cut it down to size later. Adjust the fabric's width and length (larger/smaller) according your font size, number of letters, and embellishments.

Step 4: Fabric Letters
Arrange letters and flowers on the background fabric. Cover with cloth (to prevent marks) and iron with medium-high heat (6-8 seconds). Let cool. Cut background fabric to size. I recommend 1-2" border around the letters. Iron 1/4" seam around the background fabric.

Step 5: Stitch Letter Borders
Set your sewing machine to a short, narrow zig-zag stitch. For length, I use halfway between 0 and 1, and between 3 and 4 for width. Practice a few stitches on scrap fabric to decide what works best for you. Using coordinating thread, stitch a border around each letter. I'm sure this seems like it would be super tricky, but once you practice it, it really isn't that difficult. Remember to back-stitch at the beginning and end of each letter. Trim off all extra threads.

Make sure the zig-zag covers the border of the letter.


Step 6: Fabric Strips
Cut pieces of assorted fabric into strips that are 2 1/2" wide (or larger/smaller) and varied lengths. Arrange strips into four rows (one for each side of pillow) and sew right-side ends together. This should make 4 patchwork-like fabric strips.


Line up one fabric strip to a corner of the background fabric and pin the right sides together along the entire border of the background fabric. Attach the border by sewing a 1/4" seam around the outside (follow the seam line that was ironed around the fabric already). Unpin the fabric and repeat this step for each side of the background fabric.


Step 8: Pillow Back
Lay the front pillow piece on top of material for the back of the pillow. Cut the back fabric to size. With right sides of fabric facing each other, sew front and back fabrics together. Leave a 4-5 inch gap not sewn and flip fabric right-side out.


Step 9: Stuff and Stitch
Fill pillow with batting/stuffing until you have reached desired fluffiness. Using a whip stitch, sew up the remainder of the pillow. You're finished!

*One of the fun things about making Name Pillows is that there are so many ways to change things up so that each pillow can be unique and look completely different from the last one.

Happy Crafting!
Here are a few other name pillows that I have made.

Happy Crafting!
No comments:
Post a Comment