Showing posts with label fabric. Show all posts

Monday, December 23, 2013

Simple Personalized Christmas Stockings

Christmas is almost here! Having family come in town over the holidays always adds to the excitement. Since our family members are kind enough to make the trip to our house for the holidays, I like to make sure that Christmas is extra special for them. One thing I like to do for my guests is to make each one of them a personalized Christmas stocking. Here is a simple way to make cute personalized stockings. Once finished, don't forget to fill them with treats!

Materials:
Inexpensive stockings ($1.99 each from Walmart)
Scrap Fabric
4 inch letters in your favorite font
Heat N Bond Iron on Adhesive
Scissors
Pencil
Iron

Directions:
I cut out 4 inch letters using the Storybook font with my cricut.
You can also print out letters onto cardstock or purchase traceable letters from a craft store.
Lay the letters backward onto the Heat N Bond paper side.
Trace the letters with a pencil.
Cut a block out around each traced letter.  
Lay out letter blocks onto the wrong-side of the fabric.
Using medium-high heat, press with an iron for several seconds.
Let cool.
Cut out fabric letters.
Remove the paper backing from the fabric. 
This should leave a shiny side to the back of the fabric.
Place letters onto stockings.
I placed my letters about 3 inches below the trim on the stocking.
Using a iron again, press the letter adhering it to the stocking.
(See picture below before ironing.) 
I recommend using a cloth between the iron and stocking to prevent damage.
Finished!!!

Note: In the past, I've also added a matching fabric trim to the stocking
but this year I liked the trim that was already on the stocking.


Happy Crafting!


Tuesday, November 19, 2013

"Believe" Christmas Pillow

Sometimes a single word can speak volumes.


BELIEVE


Believe.....in the joy
Believe.....in the spirit
Believe.....in the true meaning 
Of Christmas

Believe in Christmas this year.
In a previous post, I walked you through how to make a personalized name pillow.
You can can make personalized name pillows for every
name, holiday, and special occasion.
Here is the pillow that I made with my mom for Christmas this year. 

Check out the tutorial for step by step instructions on how to make a personalized pillow.

Here are some notes about making this particular pillow:
  • Use a variety of Christmas fabrics that coordinate well together. 
  • Use a mix of busier prints as well as simpler prints.
  • The use of multiple fonts within one word gives it a more modern look.
  • The Star was made from yellow scrap fabric and adds a nice pop to the pillow.
  • The presents with the ribbon were a last minute idea which gives a nice 3D touch.
  • In hindsight, I would add trim to the outside of the white background to frame up the word a little better.
  • If you have any questions, just ask!

Happy Crafting!

Monday, October 28, 2013

Personalized Name Pillows

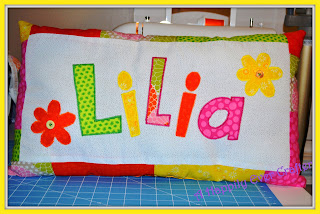
Every child deserves to have a special pillow with their name on it. I have made personalized name pillows over the last few years as gifts for my favorite kiddos. The kids seem to enjoy the the pillows and I love making them.  Follow these simple steps and you too can make a personalized name pillow for each of the special kiddos in your life.
This post will explain how I made this exact pillow and will also include suggested adjustments for you to make your own unique pillow.

Materials Needed:
Cricut Cutting Machine and accessories (or another means to make traceable letters)
Heat N Bond iron-on adhesive
Rotary Mat
Sewing Ruler
Rotary Cutter
Pencil
About 1-1.5 yard of assorted fabric ( I used 1/8 of green print, yellow print, orange print, and pink print; 1/2 yard of flower print, and 1/4 yard white print)
Coordinating thread
Buttons
Sewing Machine
Iron
Cloth (for ironing)
Sewing Needle

Directions:
Step 1: Traceable Letters
Using a Cricut cutting machine, cut out 5" letters (or larger/smaller). I used the Cutting Up cartridge for the letters and also cut out 3" flowers from the Accent Essentials cartridge. These paper letters/flowers will be used as stencils. You can also make letter stencils by printing out a font from the computer on card stock. There are a TON of free fonts out there. 

Here are the letters that I cut out from scrap paper.
Place each letter backwards onto the paper side of the Heat N Bond iron-on adhesive.  
Trace the letters with a pencil.


Cut the paper surrounding the outside of each letter (not cutting the actual letters out yet).

Step 2: Iron-on Letters
Place the iron-on letter cutouts on top of chosen fabrics. Make sure the adhesive side is facing the wrong-side of the fabric.Using a medium heat, press the iron to the Heat N Bond paper bonding the adhesive to the fabric (3-4 seconds). Let cool. Cut out letters following the pencil lines. Peel off paper leaving a shiny side to the back of the fabric.
Here is what the letters look like after being cut out. 

Step 3: Background Fabric
Cut out fabric for the background. I used a 10" X 22" piece of fabric to make sure it was going to be large enough. You can always cut it down to size later. Adjust the fabric's width and length (larger/smaller) according your font size, number of letters, and embellishments.

Step 4: Fabric Letters
Arrange letters and flowers on the background fabric. Cover with cloth (to prevent marks) and iron with medium-high heat (6-8 seconds). Let cool. Cut background fabric to size. I recommend 1-2" border around the letters. Iron 1/4" seam around the background fabric.


Step 5: Stitch Letter Borders
Set your sewing machine to a short, narrow zig-zag stitch. For length, I use halfway between 0 and 1, and between 3 and 4 for width. Practice a few stitches on scrap fabric to decide what works best for you. Using coordinating thread, stitch a border around each letter. I'm sure this seems like it would be super tricky, but once you practice it, it really isn't that difficult. Remember to back-stitch at the beginning and end of each letter. Trim off all extra threads.

 Make sure the zig-zag covers the border of the letter.


Step 6: Fabric Strips
Cut pieces of assorted fabric into strips that are 2 1/2" wide (or larger/smaller) and varied lengths. Arrange strips into four rows (one for each side of pillow) and sew right-side ends together. This should make 4 patchwork-like fabric strips.


 Step 7: Patchwork Border 
Line up one fabric strip to a corner of the background fabric and pin the right sides together along the entire border of the background fabric. Attach the border by sewing a 1/4" seam around the outside (follow the seam line that was ironed around the fabric already). Unpin the fabric and repeat this step for each side of the background fabric.


  Measure the border on each side to make sure it is even and trim the material if necessary. Cover with cloth and iron on medium-high heat. For added cuteness, I sewed a couple buttons to the middle of the flowers.


Step 8: Pillow Back
Lay the front pillow piece on top of material for the back of the pillow. Cut the back fabric to size. With right sides of fabric facing each other, sew front and back fabrics together. Leave a 4-5 inch gap not sewn and flip fabric right-side out.


Step 9: Stuff and Stitch
Fill pillow with batting/stuffing until you have reached desired fluffiness. Using a whip stitch, sew up the remainder of the pillow. You're finished!


*One of the fun things about making Name Pillows is that there are so many ways to change things up so that each pillow can be unique and look completely different from the last one.

Here are a few other name pillows that I have made.


Happy Crafting!

Friday, October 4, 2013

A Homemade Tutu for Your Little Princess

My little princess loves to play dress up. Her attire usually consists of a fancy outfit with a variety of jewelry, sunglasses, a tiara and of course a tutu. How could any outfit be complete without a fluffy and sparkly tutu! You can purchase said tutus in stores and online, however, they can be pricey and pretty generic. After a little research, I decided to try my hand at making homemade tutus for my little princess. Here is an easy and fairly inexpensive way to make adorably unique homemade tutus.

By the way, this is a NO SEW tutu. It can't get any easier.
Supply List:
Crochet Headband
Tulle (can also use fabric strips)
Measuring Tape or Cutting Mat
Scissors
Embellishments (such as ribbon, flowers, buttons)

Step 1: Gather materials. For the waistband, I used an infant 1.5" crochet headband. I already had some of these on hand but you can purchase a variety of styles, sizes and colors for super cheap online. I originally bought mine at www.girlscrochetheadbands.com.

The tulle and ribbon can be purchased at any local craft store. Tulle can be bought by the yard or in spools. If you buy tulle by the yard, simply cut into 6" wide strips. I bought oodles of tulle and didn't use half of it. Darn, I guess I'll have to make more tutus. The amount of tulle you'll need really depends on how long and fluffy you want to make your tutu. I suggest buying anywhere from 2-4 yards of tulle. I used 1.5" wide ribbon.


Step 2: Cut the tulle. This part takes the longest. You will need to take your tulle and cut it into strips. Before you do this, you must decide on the length for your tutu. Here's a chart for tutu length recommendations.

Age of Child
Tutu Length
Tulle Strips
0-3 months
4”
8”
3-12 months
6”
12”
1-2 years
8”
16”
3-4 years
10”
20”

I chose to make an 8 inch tutu for my tall 2.5 year old. Each piece of tulle was cut 6"X16". The number of strips you need to cut depends on the number of holes around the crochet headband/waistband. I like to use the second row up from the bottom of the waistband to tie my tulle. That row has 30 holes all the way around, so I need 30 strips of tulle. If you use more than one color, then divide accordingly. If you want to make a super fluffy tutu, simply fill two rows of the waistband with tulle. I know for my little princess, one row of tulle is plenty.


Step 3: Tie the tulle. Place the waistband around an object to hold it in place (leg, box, jar). You are basically going to make slip knots with the tulle around the waistband. Take a single piece of tulle and fold it in half. Push the folded end through the hole in the waistband about an inch. Separate the folded end to where it makes a loop. Send the open end pieces though the loop and tighten. Repeat for every hole in that row.


I actually tie my tulle upside down because I think it is easier. Then I simply flip the tutu inside out after I'm finished. It works like a charm. Just make sure the knotted side of the tulle is facing out.

Step 4: Embellish your tutu. I decided to simply tie a bow onto the middle of my tutu with 1.5" ribbon. For a different look, you could add strips of ribbon instead of tulle to every fourth or fifth hole or tie small bows to the middle of the tulle pieces. You could add flowers, hearts, mascots, etc. The possibilities are endless! Being able to personalize the tutu for your little princess is what it is all about.


Pirate Tutu
Here's a different take on making a homemade tutu. I made a pirate inspired tutu for my daughter to wear for a Halloween party this year. I used strips of skeleton fabric for every fifth hole and varied the lengths of tulle to give it a more tattered look. The whole family is going as pirates! Arrr! See the tutorial on homemade pirate costumes for the whole family.


I hope you are inspired to try this fun and easy way to make a tutu. If you have any questions, please just leave them in the comments below.

Happy Crafting!